Showing posts with label Tutorial. Show all posts

Sunday, March 14, 2010

Tutorial to add Google AdSense code in your wordpress blog

Tutorial to add Google AdSense code in your wordpress blog

1. Sign up for Google AdSense or any other ads provider sites.
2. login into your Google AdSense account.
3. Copy the Google AdSense code.
4. Log into wordpress.com.
5. Click "My Dashboard" in the top navigation bar.


  1. wordpress.com - My Dashboard

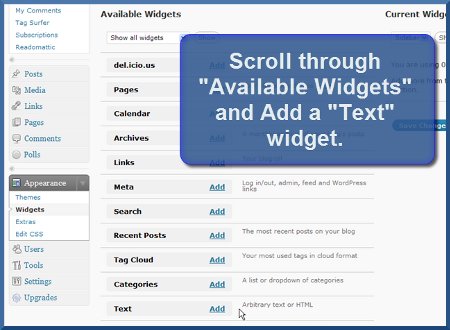
  2. Click "Appearance" and then click "Widgets" in the left navigation bar.

    wordpress.com - Appearance - Widgets

  3. In the "Available Widgets" section, add a "Text" widget.

    wordpress.com - Add Text Widget

  4. A new "Text" option will now appear under the "Current Widgets" section of your wordpress dashboard - click the "Edit" link.

    wordpress.com - Edit Text Widget

  5. Paste your StatCounter code into the main body of the Text Widget.

    [caption id="attachment_81" align="alignnone" width="300" caption="aproof.wordpress.com"]aproof.wordpress.com[/caption]

  6. Click "Done".

  7. Click "Save Changes" and that's it!

WordPress Installation Detailed Tutorial

WordPress Installation Detailed Tutorial


Please, follow the step-by-step guide below in order to activate Wordpress on your hosting account:

Step 1: Please, login to your CPanel and locate the Fantastico De Luxe icon:

Wordpress - CPanel - Fantastico

Step 2: Find and click the WordPress link.

Wordpress installation

Step 3: Then choose New Installation:

Wordpress - New Installation

Step 4: Decide upon the location of your blog - if you would like to have it as your site front page, leave the directory box blank, otherwise fill in the appropriate folder name. Next, fill in the administrator details and the e-mail account configuration then click the Install WordPress button.

Wordpress installation folder

Step 5: A new confirmation page will be loaded for the installation. Click the Finish Installation button if no errors are reported.

Wordpress - Finish Installation

If else you will have to go back and rectify the specified issues.

Step 6: After completing the installation the final screen will load, providing you with the installation details. You will be able to e-mail the details to a specified address also in order to keep them for future reference.

Wordpress - installation successful

Well done! You have successfully installed the Wordpress application!